Let's face it. Showers are the bathing option of almost everybody. So if your restroom has actually become a household traffic jam because you don't have adequate shower stalls or the one you have is leaking, read on. We'll reveal you how to change a leaking base (aka shower pan liner), change a tub with a shower only or install an extra shower to deal with demand. Preformed shower bases have actually vastly streamlined the installation process. They're practically leakproof and are vastly simpler to set up than standard strong mortar bases.
Still, setting a base can be challenging, particularly when you're redesigning older plumbing. In this article, we'll show you how to remove an old tub and change it with a one-piece fiberglass shower base. We'll walk you through the difficult parts, first how to move the drain perfect, then the required venting. Next, we'll show how to set a rock-solid base-- one that won't break or leakage down the road. Our detailed guidelines will take you right up to the point where the walls are ready to finish. However we won't enter into those finish information here.
This is primarily a pipes task. To take it on, you need to recognize with basic pipeline joining strategies. Mostly this includes cutting and cementing plastic pipes and fittings. Don't fret if you make errors. The materials are economical and corrections are easily made by eliminating areas and installing new fittings and pipes.
Finishing this task-- getting the old tub out, remodeling the plumbing and installing the new base-- will take a Saturday at least, a weekend at most. If you have to run a drain line through joists or studs, we advise that you lease a 1/2-in. right-angle drill and a 2-in. hole saw (or bit). Otherwise, basic plumbing tools and hand tools are all you'll require. Make sure to apply for a plumbing permit and have an assessment done at the rough-in phase (when everything is still exposed) and after whatever is complete (wall surface areas finished, final hardware set up).
Planning the Job
Start by deciding on the size of the shower base and buying it. Shipment can take weeks, so do not rip anything apart up until the new one remains in hand. If you're changing an existing base, simply get one the same size. If you're replacing a tub with a shower as we did, there are more details to consider. You'll have the least problems if you match the new base to the old tub's width (the front of the tub to the wall). Go larger if you like, but you may need to change flooring. Or you might exceed needed minimum ranges from toilets and sinks. You may have to move the supply valve too. Keeping the very same tub footprint (or smaller sized) lessens the hassles.
We replaced a 5-ft. tub with a relatively large 4-ft. base the same width as the tub. We framed a 1-ft.- broad filler wall at the end, which is a great location to construct recessed specific niches and racks for shower products.
Now's a great time to buy a new shower valve too, particularly if your old one doesn't have actually heated protection, as all brand-new ones do. It's a big project to replace a valve that fails after tile or wall panels are set up.
You'll require an assortment of pipelines and fittings for setting up the brand-new drain and for reworking water lines. Choose them up after you open the flooring and walls. At that point, you can see what you need, plan the brand-new drain and water supply runs and make a list of products. Make a sketch like Figure A to assist you keep an eye on parts.
Shower Base/Drain Particulars
Make a sketch of the job that includes the waste, vent and water system. Drawing the information will assist prevent potential issues and also lower the variety of trips to the hardware shop.
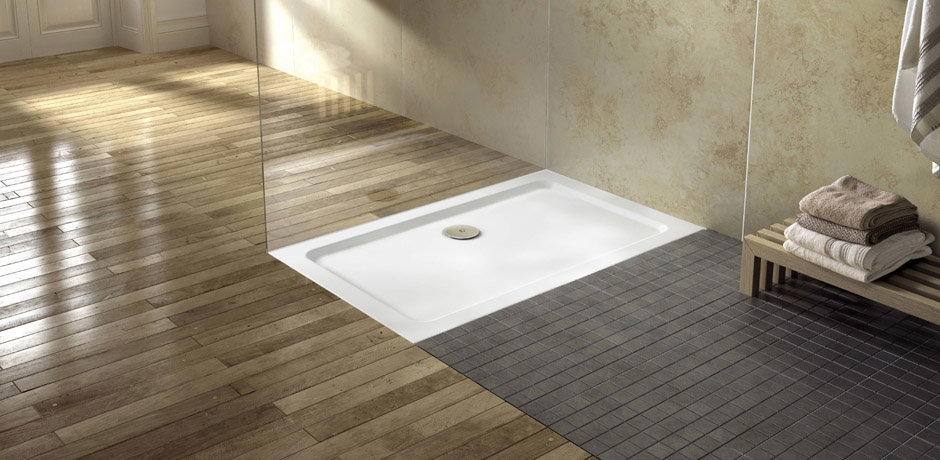
It's also crucial to note that you won't be able to enter a house center and go out with a 4-ft.- long shower like the one we display in this task. Ask to go through the plumbing component books there to special-order one that suits your bath decor and spending plan. Some featured drain adapters, as ours did. You'll need to examine and buy a separate shower drain package if required. The manufacturer's directions will assist you select the ideal one.
There is another (but more costly) choice if you want to avoid all of the extra venting and drain work. Select a shower tray that has the drain located at one end, right or left, picked to match your old tub drain. Select one the same length as the tub and you won't even require to add filler walls. Since the drain position approximately matches the tub drain, you might not have to add a separate vent, cut out and spot the flooring, or reroute the drain line.
Eliminate the Wall
Initially, loosen the showerhead and the tub spout. Many styles will unscrew, however some will require persuasion with a pipe wrench. If you wish to recycle any parts, cover the tool jaws with a fabric to prevent damage. Then remove the manage and blending valve escutcheon cover. Most manages have a little plastic cap that pops off to expose a screw. Get rid of the screws and pull off the handle and the escutcheon.
Next, strip off the tub surround. Begin by cutting totally through the drywall around the boundary with an utility knife. If you have cement board behind the tile, just cut through the tape joint at the ceiling and strip the entire wall. Rip off the tile and drywall together in huge pieces. If you have a fiberglass surround with a flange behind the drywall, cut 2 in. beyond the enclosure and pry the sections totally free one at a time.
Detach the Pipes
With the wall open, disconnect the pipes and turned off the primary supply of water valve. Typically, you can access the trap from an access panel in the space behind the tub or from an incomplete basement. If you do not have gain access to, you'll need to cut a hole in the wall from behind the tub base. If your shutoff valves are in good shape, cut off the water lines above them. If they're missing out on, stuck or wore away, turned off the primary supply valve, cut off the water lines and set up two compression fitting-- style ball valves and leave them in the closed position so you can turn the water back on to the remainder of the house. Cover the ends with tape to keep out debris.
Eliminate the Tub
Detach the trap from the tub drain, then raise the tub free from the wall. Fiberglass and steel tubs are fairly light, so you can just tip them up and carry them away. If framing makes it difficult to take out, eliminated more drywall along the pipes wall. Then you can pull the tub far from the wall prior to you tip it up. Cast iron tubs, on the other hand, are exceptionally heavy, and we recommend simply busting them up with a sledgehammer and carrying out the pieces. (Lay an old blanket over the tub to catch flying fragments, and wear shatterproof glass for this!).
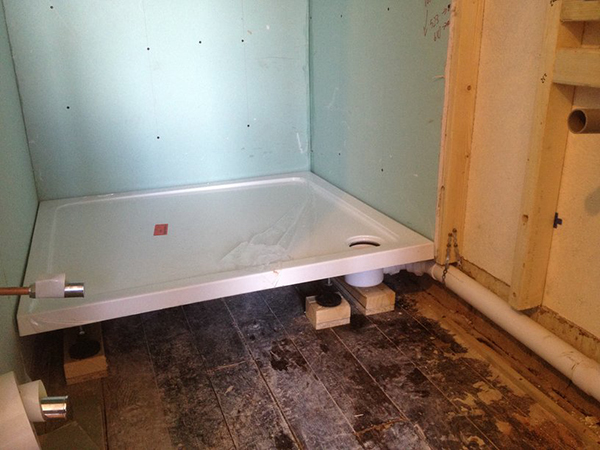
Mark the New Drain.
Snug the brand-new shower tray as much as the wall studs and mark the drain hole.
Cut a Gain Access To Slot.
Put the new shower pan liner aside and draw a gain access to slot on the subfloor, roughing in the brand-new P-trap and drain line. Make the slot about a foot wide and extend it just beyond the brand-new drain place. Keep the edges of the slot over the center of the joists anywhere you can to make patching simpler later on. Pull any nails that fall within the cutting lines. Then set your blade depth to cut just through the subfloor, make the cut and pry it free. Make sure to make reference marks on the flooring outside the slot so you can move the center of the drain as soon as you remove the floor covering.
Cut a Course for the Drain.
With the flooring and wall open, you can prepare your new drain and vent lines. Revamping drain and vent lines will be a little different with every bathroom, but our images and Figure A will offer you the basic idea along with a look at the various fittings you may require.
The two secrets for adding a drain are to make certain the horizontal lines slope 1/4 in. for each running foot and that the P-trap opening falls directly below the shower drain hole. Start by determining the height of the center of the existing drain line and the distance to the brand-new drain. Cut off the old P-trap, then run the drain line to the brand-new drain area. Drill 2-in. holes through the flooring joists for the new drain line. Reference marks help you discover the drain center later on.
Keep in mind to enable 1/4-in.- per-foot slope when you drill holes in joists. Drill 2-in. holes to leave some space to move the 1-1/2- in. pipe up or to get the needed slope. However do not drill in the lower or upper 2 in. of any joist. Most shower drains are developed to get 2-in. piping, while a lot of existing tub drains are 1-1/2 in. The pipes code requires the transition to be made with a reducer directly below the shower, no place else.
Install the Sanitary Tee.
To run the brand-new vent, mark an area of primary stack for removal utilizing the 3 x 1-1/2- in. tee (with 6-in.- long nipples) as a guide. Cement 6-in.- long nipples to both ends of a 3 x 1-1/2- in. sanitary tee, then mark and cut the primary stack. Join it to the stack with shift couplings.

Run the Vent.
If your tub didn't have a vent, you'll probably need to add one. A regional pipes inspector will inform you the rules (normally within 42 in. of the shower P-trap) when you get a permit. The brand-new vent should sign up with the main vent a minimum of 6 in. above any "spill lines" (that normally indicates sink rims) that share the vent. If your main stack will be plastic, sufficing is easy with a hand or reciprocating saw with an 8-in. blade. If you have actually cast iron, you'll need to rent a pipe snapper to make it.
Run the vent line down to the drain by drilling 2-in. holes through the studs, sloping far from the tee 1/4 in. for every 1 ft. of run.
Dry-Fit the Waste and Vent.
Cut all the pipes and dry-fit the brand-new vent line and drain line fittings one at a time, working your method towards the P-trap. Start cementing the parts together. If you're utilizing PVC, hold the parts together for about 20 seconds after sealing. Otherwise, the parts will "squirt" apart before the solvent remedies. Save the P-trap-to-drain-line connection for last. Cement it together, and quickly plumb the P-trap with a 6-in. level prior to the joint sets.
Usage reference marks on the subfloor to fine-tune the area of the drain. Set the shower base in place to double-check the last positioning of the P-trap, inserting a short, momentary tailpiece. When you set the shower pan completely, procedure and cut a long-term tailpiece and cement it into place. Your building inspector will wish to see the drain and vent (and possibly the water supply rough-in) prior to you close up the flooring.
Close the Floor
Add obstructing to bolster unsupported plywood edges and screw a spot to the framing with 1-5/8- in. screws. We included a second layer of 1/2-in. underlayment under the whole shower for a sturdier floor and to much better match the ended up floor height (1/2-in. backer board and tile). If you require to protect the original floor height, skip the second layer, but include obstructing under the single-layer patch to completely support the shower base.
Mount the Mixing Valve and Renovate the Supply Lines
Unless you're preparing to reuse all of the existing supply lines and valves, simply cut out and remove whatever and begin fresh. Utilize a hacksaw or a reciprocating saw.
If you've picked a shower base that's larger than the tub, center the brand-new mixing valve and showerhead over the base. Choose a valve height that's comfortable to reach and clears any challenges, and make sure the showerhead lands either above or below the leading edge of the shower enclosure or tile. Mount the mixing valve initially, following the maker's instructions, and run brand-new CPVC or copper tubing from the ball valve to the mixing valve and showerhead. Cap the tub spout outlet on the underside of the blending valve. You'll require to include blocking to support it.
There might be a threaded nipple or hole in the bottom of the mixing valve for a tub spout. Make certain to top that. After whatever is together, shut off the blending valve, turn on the water and look for leaks.
Level the Base and Mark the Studs
Level the shower base upon all 4 edges, shimming where needed. Mark the lip where it abuts studs. Measure, cut and seal the final tailpiece to the P-trap. Take your time. Getting the base level is vital for good drain. Mark the lip height on the studs and describe the shim areas so you can lift out the base and return it to the exact position. Some bases require that you fit it over a tailpiece when you set it in the mortar.
Set the Base in Mortar
To set the base, mix up about half a 60-lb. bag of mortar with water to a velvety consistency. Avoid concrete mix; stones in the mix will hold the base away from the flooring. Spread out the mortar over the flooring under the base, about 1 in. or so thick. Then lower the base into the wet mix, requiring it down to the shims and the stud marks. Ensure to push it against the wall. Let it treat overnight. Don't utilize the base as a work platform up until the next day or you'll disrupt the mortar before it cures. Clamp the base lip to each stud if clamps are included with the unit. Otherwise, clamp it with fender washers and 2-in. screws. Avoid drilling through the lip and screwing the base straight to the studs. The base may break and leak.
Complete the Drain Hookup
The brand-new shower stall base will have directions to direct you through the last drain connection; your drain system may differ from ours. However our shower stall bases directions were to anchor the base to the studs with screws and washers and after that push the rubber gasket into location and seat it with a nut chauffeur. Basic instructions for how to finish the drain hookup for the new shower stall base are to cut the tailpiece and cement it at the right height. If your drain has a thick rubber gasket, wet it with soapy water and after that work it around the tailpiece pipeline. Complete seating it by driving it down with a blunt tool.
Drain Cover
Connect the drain cover to the drain opening.
Complete Shower Framing
Frame completion wall a minimum of 80 in. high for shower doors and curtain rods. Furthermore, our base was shorter than the old tub, leaving a space in between the wall and the base. We filled in the area with a 2x4 wall. Add backing where the new walls satisfy existing ones to make the connection strong and for anchoring backer board. And if you leave it except the ceiling as we did, you can include a practical built-in shelf.
Copper vs. CPVC
If you're comfortable dealing with and soldering copper, by all means, go on and utilize it for your water supply lines. We show CPVC plastic fittings since the installation is as easy as cutting and sealing plastic fittings, just as you make with plastic drain and vent lines. To make the shift from copper to CPVC, utilize compression fittings as revealed. You'll discover all the CPVC fittings and pipelines you require at any hardware store or home center.
No comments:
Post a Comment